
With the new Apple iOS update to iOS 13, parents will be interested to know of the new options for ScreenTime settings. Some of the new options for ScreenTime in iOS 13 include the ability to block specific apps, set combined time limits, limit access to a category of apps and coming soon are communications limits. Apple has also added “One More Minute” and expanded the usage data so that you can see usage over 30 days.
This post uses affiliate links. If you click on my links, I may receive compensation at no extra cost to you. Read my disclosure policy for more info.
Before setting up ScreenTime, make sure that you are fully utilizing Apple Family Sharing so that you can get the most out of ScreenTime. By setting up Family Sharing first, you will be able to control the ScreenTime settings of your kids’ devices from your iPhone.
Setting up Family Sharing (if you haven’t already)
Apple Family Sharing works for families that both the parents and the children have iPhones. (If parents have an Android phone, they will have to manually set ScreenTime from the child’s phone.) . Before you get started, it is very important to make sure that the child’s birthday is correct in their Apple ID if they already have one. Here are the steps you will need to follow to set up Apple Family Sharing.
- Select Settings on the iPhone belonging to the parent setting up the Family Sharing.
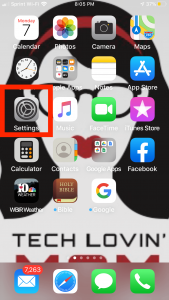
- Click your Apple ID at the top of the screen.
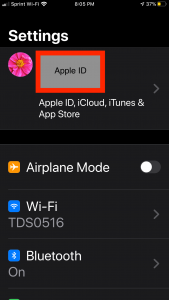
- Click “Set Up Family Sharing”.
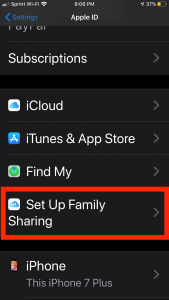
- Click “Get Started”.
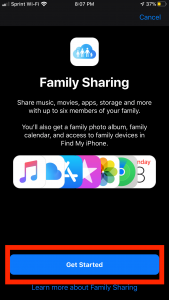
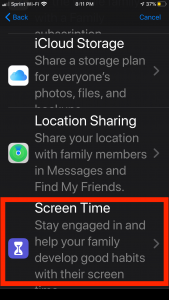
- Scroll down and choose “ScreenTime”.
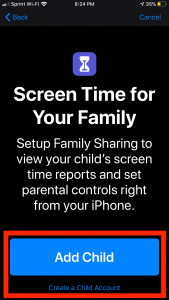
- If the child has an Apple ID already, click “Add Child”. If the child does not already have an Apple ID, click “Create Child Account” and follow the prompts. If you create an account on this step, make sure you turn on “Ask to Buy”.
- If adding a child with an existing Apple ID, enter Apple ID credentials at this time. If they are older than 13, you can invite them by text or email. Then click Next.
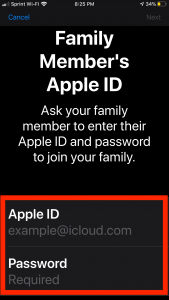
- This will send a two-factor verification ID to the child’s device. You will need to enter that code if you are setting it up manually.
- Your children will now show up in your ScreenTime settings.
Setting Up ScreenTime Features
Now that you have Family Sharing set up, you can set up ScreenTime for your children from your iPhone. Both the parent and child devices will need to be updated and running iOS 13 for these new ScreenTime features to work. (If you have an Android or you did not set up Family Sharing, you will need to complete the following steps from your child’s iPhone.)
- Go back to Settings and scroll down and choose “ScreenTime”.
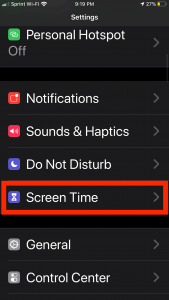
- Once in ScreenTime, the top of the screen will show your ScreenTime. Scroll down until you see your kids’ names. Click on the child’s name for which you want to setup ScreenTime.
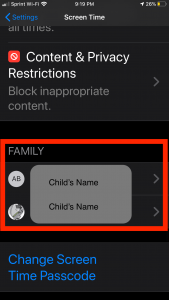
- Click “Turn on ScreenTime”.
- Choose a four digit ScreenTime passcode. *It is very important that you pick a passcode you will not forget.*
- Next, you will add settings for each of the categories.
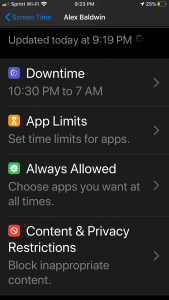
DownTime
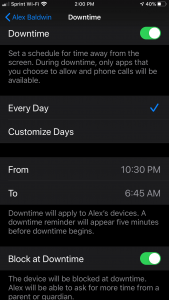
Here you can choose a downtime for your child to have time away from the screen. During downtime, only the apps that you choose to allow will be available. You can choose the same downtime for every day of the week or you can customize it for each day. Don’t forget to scroll to the bottom of this screen and toggle on “Block at Downtime”. If you forget to toggle this on, your child can choose to ignore the downtime limit.
App Limits
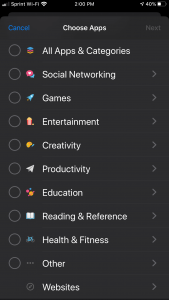
Here you can set daily time limits for entire app categories or just specific apps. You can click the arrow to the right of the category to choose specific apps. Again, make sure after setting the amount of time allowed, scroll down and toggle on “Block at End of Limit” or your child can choose to ignore the App Limits.
Always Allowed
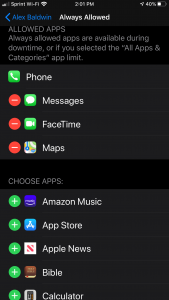
Here is where you choose the apps that you want available to your child even during downtime or if you selected “All Apps & Categories” in App Limits. The Phone is always allowed. You decide what else you want to always allow.
Content & Privacy Restrictions
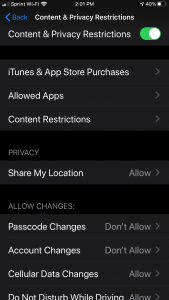
These are probably the most important settings inside ScreenTime so take some time to really go through these settings. First, turn on Content & Privacy Restrictions. Then go through each setting under that and decide what to allow. You can decide whether to allow the installation and/or deletion of apps and whether or not they can make in-app purchases. You can decide to turn off particular apps.
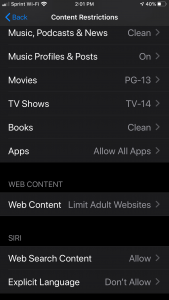
One of the most important parts of this section is Content Restrictions. This is where you decide what ratings to allow. You can set it to Clean instead of allowing Explicit Lyrics in Music and Books. You can set the age ratings for Movies and TV Shows. Under Web Content, make sure you Limit Adult Websites. With this toggled on, your child will not be able to delete any of their Safari search history so that they cannot hide where they have been on the Internet. You can turn off Explicit Language for Siri and decide what you want to allow in Game Center.
You can also decide whether or not to allow things like passcode changes, account changes and cellular data changes among other things.
“One More Minute”
Another new feature is called “One More Minute”. It is a message that pops up when the child has reached their app limit or is approaching their downtime. If they accept the pop-up offer of “one more minute”, it gives them 60 seconds to save their progress or finish reading.
Coming Soon – Communication Limits
Communication Limits is another feature that is coming to iOS 13. I am running iOS 13.1.2 as of the writing of this post and I do not have it yet. Communication Limits will allow parents to be able to manage the contacts on their children’s devices. You can turn on a feature that allows communication only from people listed in their contacts. This will control who your child is able to call, text, FaceTime or AirDrop with. The beauty of this is that the parents can also control who is in the contacts on the child’s phone. I think this is one feature that many parents have been waiting for.
ScreenTime in Conjunction with other Child Safety Software
Need help keeping your kids safer while online using their devices? Here are some great options:
- Use Circle Home Plus to filter all your kids’ devices including phones, tablets, game consoles and more.
- Use Bark Monitoring software to monitor texts, emails, social media and more.
- Use the Bark-O Matic Personalized Resource for Parental Controls to get a step by step list to set up device-specific parental controls.
- If your kids have Chromebooks, check out this post to set up the Chromebooks to keep your kids safer while using the Chromebook.
